What is Exposure in Photography?
If you are beginning the process of learning photography, you’re probably reading and hearing the term “exposure” a lot. You may think, “What is exposure in photography?” In this post, I’ll explore the basic concept of exposure.
TL/DR: What is exposure in photography? Exposure in photography refers to the amount of light that passes through the lens and into the camera body where it interacts with the camera’s sensor (digital) or film (analog). The amount of light will determine how light or dark the resulting image is. Too much light results in over-exposure which results in loss of detail in the whites and highlights of the image. Too little light results in under-exposure which results in loss of detail in the darks and shadows of the image.
Read all about the online course here!
If we haven’t met before, I’m Kelley Hoagland! I’m a wife, mother of 3 girls, and family photographer based in Chattanooga, TN. I love creating timeless artwork that documents the lives of my family and clients. If you long to master the basics of photography, I’d love to help you!

What is Exposure in Photography?
Mastering the ability to create a balanced exposure is one of the most fundamental skills in photography. In photography, exposure is defined by the amount of light that reaches your digital camera’s sensor or analog camera’s film. In order to make an image, light must travel through the hole in your lens (aperture), past the open shutter, to the camera’s sensor or film (sensitivity to light is called ISO).

How much light exists in the scene as well as how the camera settings of aperture, shutter speed, and ISO work together to control the amount of light let into the camera dictate exposure. These three camera settings are known as the “exposure triangle“.
“What is exposure in photography” in more basic terms? Exposure refers to how bright or dark an image is overall.

This post contains affiliate links. This means this website may receive compensation if a purchase is made through the link at no extra cost to you.
Underexposure
An “underexposed” is too dark. This occurs when not enough light hits the camera’s sensor or film. On my Sony a7iv, my shutter resists firing if the camera does not sense enough light.
The problem with underexposed images is that the camera may record too little detail in the darkest parts of the image.
On digital cameras, slightly underexposed images shot in RAW format (as opposed to jpeg), can be “pushed” or adjusted and salvaged in the editing process. RAW files encode more details of the image than do jpeg files. This allows for more latitude during the editing process. However, extremely underexposed images result in more grain/noise when drastically adjusted in Lightroom. If the image is too dark, there may be a total loss of data in the darkest parts of the image that cannot be regained through editing.
I personally find that drastically underexposing portraits can also distort skin tones. I generally try to achieve a balanced exposure in camera, but will slightly underexpose a digital image if absolutely necessary.
Film photography functions quite differently. Underexposing a film image can result in flat, muddy colors and skin tones. It’s not a great look! While some salvaging can occur when working with digital scans of film images in Lightroom, I generally try to avoid underexposing film at all cost.


Overexposure
When an image is “overexposed”, the image looks too bright. In this situation, too much light entered the camera. The resulting image will be extremely light or “blown out”. In this case, there may be a loss of data in the brightest parts of the image.
When using a digital camera, overexposed images are harder to correct in post production editing than are underexposed images. Details will be lost in the brightest areas of overexposed images. For example, pretend your subject is wearing a white shirt in an overexposed image. Even if you bring down (darken) the exposure in Lightroom, the shirt still wont look right because details like the texture and folds of fabric weren’t recorded by the camera. Avoid drastically overexposing images on your digital camera at all cost!
Once again, film photography functions in the opposite manner. While digital photography better handles a bit of underexposure, film handles a bit of overexposure. Always remember that film loves light! While one could certainly take this concept to the extreme, in general, an overexposed film image remains usable and still retains beautiful details. I actually intentionally err on the side of overexposure when shooting film.
How To Tell If An Image Is Correctly Exposed
I hope importance of exposure is in photography becomes more evident now. Without mastering this fundamental concept, you run the risk of creating unusable images. Worse still, you’ll spend hours in front of your computer trying to correct and tweak you images until you go cross-eyed. No Thanks!
At this point, you may be thinking: “I’m starting to get what exposure is in photography. But how do you know if the exposure is correct?” Do I just eyeball it? Can you just guess? Thankfully, several tools exist to help us dial in a correct exposure.
Internal Exposure Meter
Modern digital cameras and even some later generation film cameras possess an internal exposure or light meter. These light meters take a reading of the light from the frame and compute the proper exposure. With modern cameras, you choose different light metering modes. On my Sonya7iv, “multi” mode takes light from all areas of the frame and calculates an overall average for the exposure. Center mode gives greater priority to the light reading in the center of the screen when calculating exposure. In spot mode, the camera measures light in only the very center of the frame. A little circle shows on the screen to indicate the measured area.
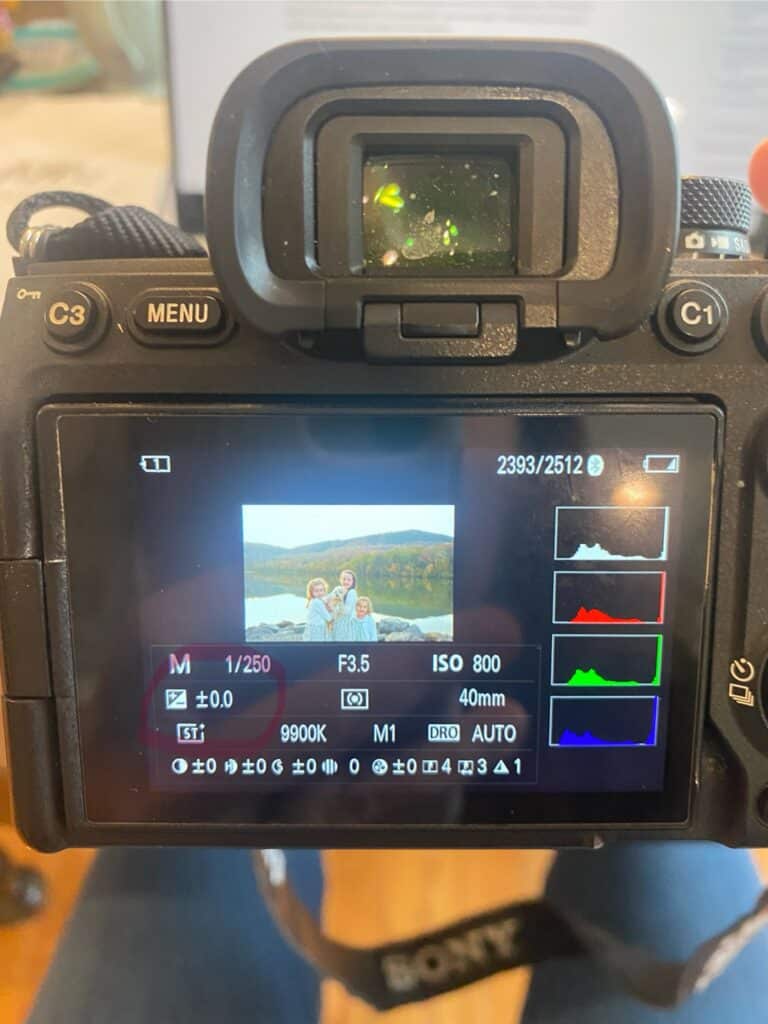
A number line in the view finder or camera body screen usually denotes exposure. My camera uses both locations! Sometimes “+/-” followed a number denotes the exposure. Every camera make and model has a different setup. I’ll show some examples of where I find reading from the internal exposure meter of my Sony a7iv below.


Universally, a reading of “0.0” means the light meter reads your settings as a correct exposure. If the dash rests to the right of the zero, the image may be overexposed. To the left of the zero, the image may be underexposed. The further the dash moves to the left or right, the further your settings read from a properly exposed image.
Histogram
Most modern cameras also possess a graph called the “histogram”. The histogram shows the distribution of an image’s exposure across several tones, including highlights, midtones and shadows. It indicates the overall exposure of the image as well as the contrast of the image. To be completely honest, I typically only utilize the histogram when testing exposure for flash photography. However, I did want to share it as one mode of measuring exposure.
With a largely centered histogram reading, the image is exposed. When the graph drifts to the left, the histogram indicates underexposure. Graphs to the right indicate overexposure.

Incident Light Meters
I actually don’t rely on my internal light meter alone when dialing in exposure! The internal camera light meter measures light bouncing off of the subject. It can be easily fooled! I caution against shooting in “auto mode” if you want to take better photos for this reason. Imagine you taking a picture of a person wearing a white shirt. Lots of light will reflect off of the white shirt. If your subject then changes into a black shirt, less light will reflect. The camera may read the scene as darker than before. In auto exposure, the camera may try to increase the exposure to compensate for the darker shirt, not understanding that the overall light of the scene hasn’t changed.
I prefer to use incident light meters. Incident light meters read the light hitting your subject (as opposed to the light reflecting off of your subject). Traditional electronic light meters, like the Sekonic work this way. When held in front of the subject with the light meter bulb pointing to where you intend to take the photo, you can measure the light more accurately. Your subject’s wardrobe or skin tone won’t affect the reading!
While I own an electronic light meter, my preferred incident light meter actually works in sync with the internal light meter of the camera!
My go-to light meter is the Expodisc.
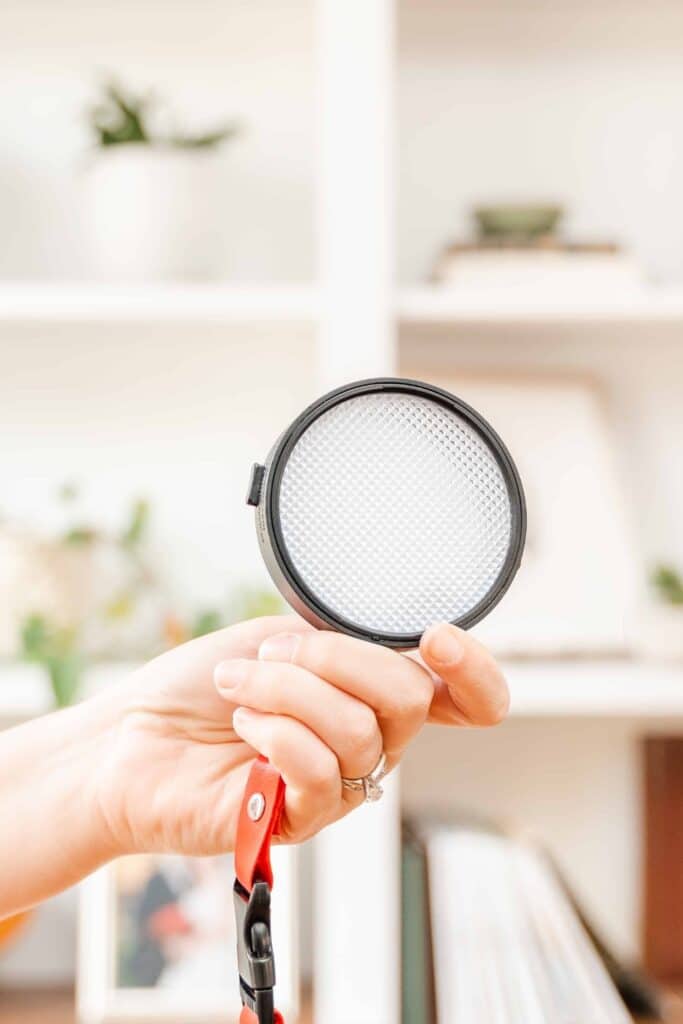
When using the Expodisc, the photographer covers the lens with the Expodisc and stands where the subject will be located. Point the camera back in the direction where you intend to stand to take the photo. With the lens still covered by the Expodisc, reference the internal light meter and adjust settings until the exposure meter reads “0.0”. Return to your shooting spot and don’t touch your exposure settings unless the light changes or you change locations. I prefer this method because it keep my camera for being fooled by elements in the scene. It also creates a consistent exposure which can allow batch editing in Lightroom.

Summary of What is Exposure in Photography
I hope you will leave this article with a greater grasp on what is exposure in photography. In a nutshell, exposure measures the brightness or darkness of an image. Exposure is controlled by the interplay of the light in your scene, aperture, shutter speed, and ISO. The goal of photographers is a balanced, accurate exposure! Thankfully, modern photographers have several tool to utilize, including in camera light meters and incident light meters.
Still have questions about “what is exposure in photography?” I’m happy to chat! You can contact me here or join my newsletter below!
Related Post: How To Fix Blurry Photos