How to Fix A Blurry Photo
Wondering how to fix a blurry photo? You’re going through your images. You find one that’s perfect. The kids have the cutest expressions. The lighting and composition look just right. You’re thrilled- until you zoom in on the photo and realize one of the kids is noticeably out of focus. Bummer!! Can you salvage it?
In this post, I’ll be sharing my tips for how to fix blurry photos. Let’s discuss how to prevent them AND how to save that almost perfect on your SD card.
This post contains affiliate links.
In case we haven’t met, my name is Kelley Hoagland and I am a family and newborn photographer in Chattanooga, TN. I’m also a mom and wife of 3 little girls, so you know I’m used to taking photos of wiggly little kiddos and sometimes missing focus.

How to Fix A Blurry Photo After It’s Taken
Let’s cut to the chase about how to fix a blurry photo after it’s taken. I have personally tried to fix blurry photos in Photoshop and Lightroom following online tutorials. I generally found the process time consuming and wasn’t super pleased with the results. (Maybe I just need more practice.)
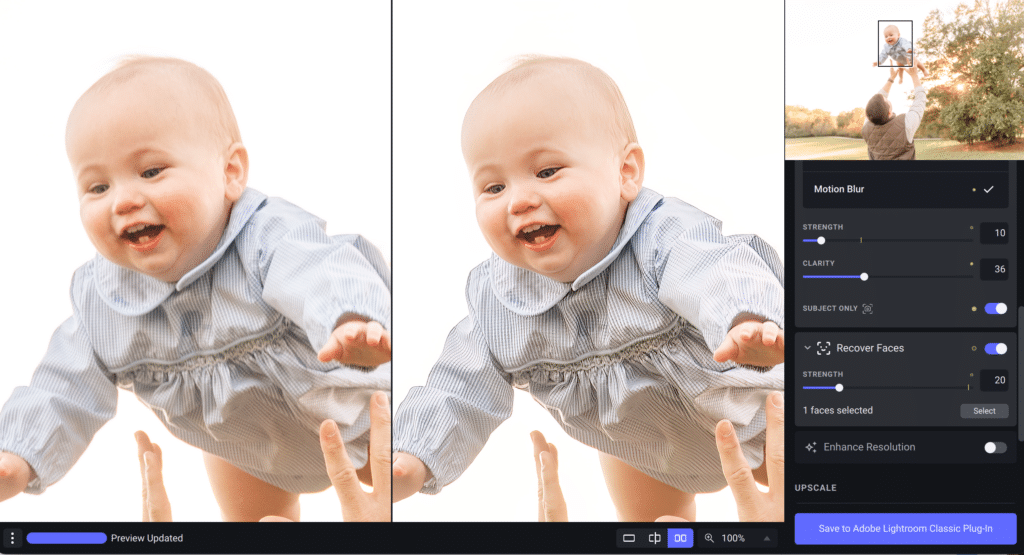
My favorite tool for quickly fixing missed focus is Topaz Photo AI! Topaz integrates with Lightroom. It has the ability to recover faces, denoise a grainy photo, sharpen and enlarge your images. Once you’ve adjusted the photo in Topaz, it saves your updated image back in Lightroom, allowing you to complete further edits as needed and export with the remainder of your photos!
Do note: I mainly use this tool with images that have a slightly missed focus or when a few of the people in a group photo are not as sharp as everyone else. I haven’t tried Topaz on photos that are completely out of focus, mainly because the Sony a7iv I use really nails focus most of the time.
How I Use Topaz AI to Fix An Out of Focus Photo
I find that I’m happiest with my results when using Topaz if the focus is “soft” rather than way off. I’ll include some examples below. Topaz will work off of your RAW file, so I would recommend either correctly the out of focus photo before editing with your preset (because it will save it back to Lightroom without all of the edits you did on the original photo). However, I will sometimes take an edited photo into Photoshop to make tweaks first. If I save the image from Photoshop back to Lightroom before using Topaz, the preset stays in place. (I hope that makes sense!)

To fix an out of focus image, in Lightroom I click File > Plugin Extras > Process with Topaz Photo AI. I then click “edit a copy”. This opens up the Topaz interface. From there you can play around!
Tip: When trying to fix out of focus faces, I find that you have to be careful! If you leave the “recover faces” setting at 100, the results may look fake. I often move that slider down to 40 of lower. Lowering the “strength” of the Sharpen setting can also help avoid a cartoonish look. In this photo I set the Sharpen strength to 10 and the Recover Faces strength to 20.

When you are happy with the edits, click “Save to Adobe Lightroom Classic Plug-In” and the image will be saved back in Lightroom next to original image! How simple is that?
How to Prevent Blurry Photos Before They Happen
As I’ve explained, Topaz is my favorite tool for fixing photos I’ve already taken. However, ideally, you’ll nail the focus in camera and won’t need to fix it afterwards. While Topaz makes the process fairly quick and painless, it still take extra time. If you are frequently missing focus in your photos, you likely are dealing with one of two problems: incorrect camera settings or a lens that needs to be serviced.
1. Incorrect Camera Settings
Choosing the correct camera settings is key to nailing the focus and avoiding blurry photos. I do rely on Sony’s Eye/Face Auto Focus mode. It’s so good at choosing the correct focal point. This especially true when photographing active young families. (If you shoot a different type of camera, you may want to explore different focus modes and see if that makes a difference in the sharpness of your images. Make sure you’re actually in auto focus mode as well. I’ve worked with some lenses that only have manual focus.) Generally when I have a loss of focus, I find that it’s due to my choosing a less than optimal shutter speed or aperture.
Remember, shutter speed is responsible for stopping motion. If your subject moves around and your shutter speed is too slow, you risk losing focus. A good rule of thumb is to use a shutter speed of 1/500 or faster when photographing human movement.
Aperture is responsible for controlling the depth of field in your photo. This means aperture controls how much of your image is in focus. I like shooting with a narrow depth of field because it creates more bokeh and blur in the background, helping my subject pop. However, this can get me into trouble if I use a depth of field that is too narrow when photographing a group. Part of the group may be in focus while one or two of my subjects might get left out of the area of focus. A good rule of them for aperture is to use an f-stop that is equal to or more than the number of people you are photographing. I also generally try to get everyone on the same plane when photographing a traditional portrait.
If you are still trying to make sense of exposure camera settings and need a little help, check out my free Exposure Triangle Cheat Sheet for more tips!

2. Your Lens May Need To Be Serviced
If you’ve tried out different focus modes and adjusted your exposure camera settings, but are still are consistently missing focus, it may be time to have your camera or lens serviced. Just like pieces of your car break down over time with wear and tear, your camera body and lens do the same. This is especially true if you have put a lot of “miles” on your camera, also known as having a high “shutter count”. It may be time to drop by a local camera shop. There are also many repair companies you can ship your camera to for service.
My Two Cents on How to Fix Blurry Photos
There you have it! If you want to know how to fix a blurry photo you’ve already taken quickly, my go-to recommendation is Topaz. However, the ideal scenario to nail the focus to begin with. If you are consistently struggling to nail focus in good lighting conditions, it’s time to take a look at the camera settings of Aperture and Shutter Speed. It’s also a good idea to double check your focus settings and make sure you are using the best option. If your camera is still consistently missing focus, it’s time to have a professional take a look at the camera body or lens.
I hope you’re found this post helpful! Let me know how your photography journey is going! Have you found a way to recover out of focus images? I always love to learn new things! Drop a note and share your tips!